自建音乐库的困境 #
十五年前开始混迹PT圈的时候,就想要组建自己的数字音乐库。从Foobar到Plex、再到Roon,终于接近了自己理想的样子。回望这些年,总结组建私有数字音乐库的困境,有三:
- 资源获取难。快速(甚至是自动化地)获取专辑完整、格式正确、元数据规范的资源并不是一件易事,如果将时间花在各个论坛上手动搜刮,会快速消耗自己的热情。我的音乐资源获取方式,曾经主要是PT站(OpenCD、What.CD/Redacted)和资源型博客(如 odeonmusic.blogspot.com)。这几年随着流媒体服务的完善,逐步转向以Qobuz和网易云为主、PT站为辅的方式,特别是以Qobuz为代表的流媒体,资源元数据打得标准,特别适用于Roon的识别。
- 元数据管理。原始资源越规范,元数据管理的难度越低。即便如此,至今没有一个元数据服务能覆盖多样化的音乐风格。Roon已经做得很好了,尤其在古典领域。我曾经试图通过Discogs完善缺失的元数据,最终当然是弃坑了,用户的精力还是应该用在确保本地文件元数据的准确性上。
- 推荐系统。不一定要由算法驱动,但一定要有一个新鲜的歌单,否则私人音乐库犹如一潭死水。可以是基于本地数据的推荐,也可以是由外部平台的推荐。Roon+Qobuz这套组合在除华语音乐方面可用性不错,但华语音乐仍然需要依赖国内的服务商。
 Roon的推荐、官方或社区维护的歌单
以下将分享我使用Roon+Qobuz+网易云构建一站式的数字音乐库的一些经验,还包括一些Roon的网络设置建议。
Qobuz专辑的自动入库 #
Roon已经集成了Qobuz,但是Qobuz的长期订阅费用高昂(~800RMB/年),我们可以充分利用Roon的播放列表和入库功能,从而可以使用月抛版的Qobuz(约12RMB/月)来节省开支:
- 在Roon中,建立包含来自Qobuz专辑的播放列表,更换Qobuz账号后,Roon会自动重新索引;Roon还会自动在本地库中匹配曲目,以替换在线音源。
- 将Qobuz的专辑点击加入库中,该专辑就会自动在Qobuz中添加红心,而在Qobuz中取消红心,Roon也会自动去除该专辑。我们就可以很容易地使用Qobuz的API并结合
streamrip库来自动抓取、下载和管理这些红心专辑了。
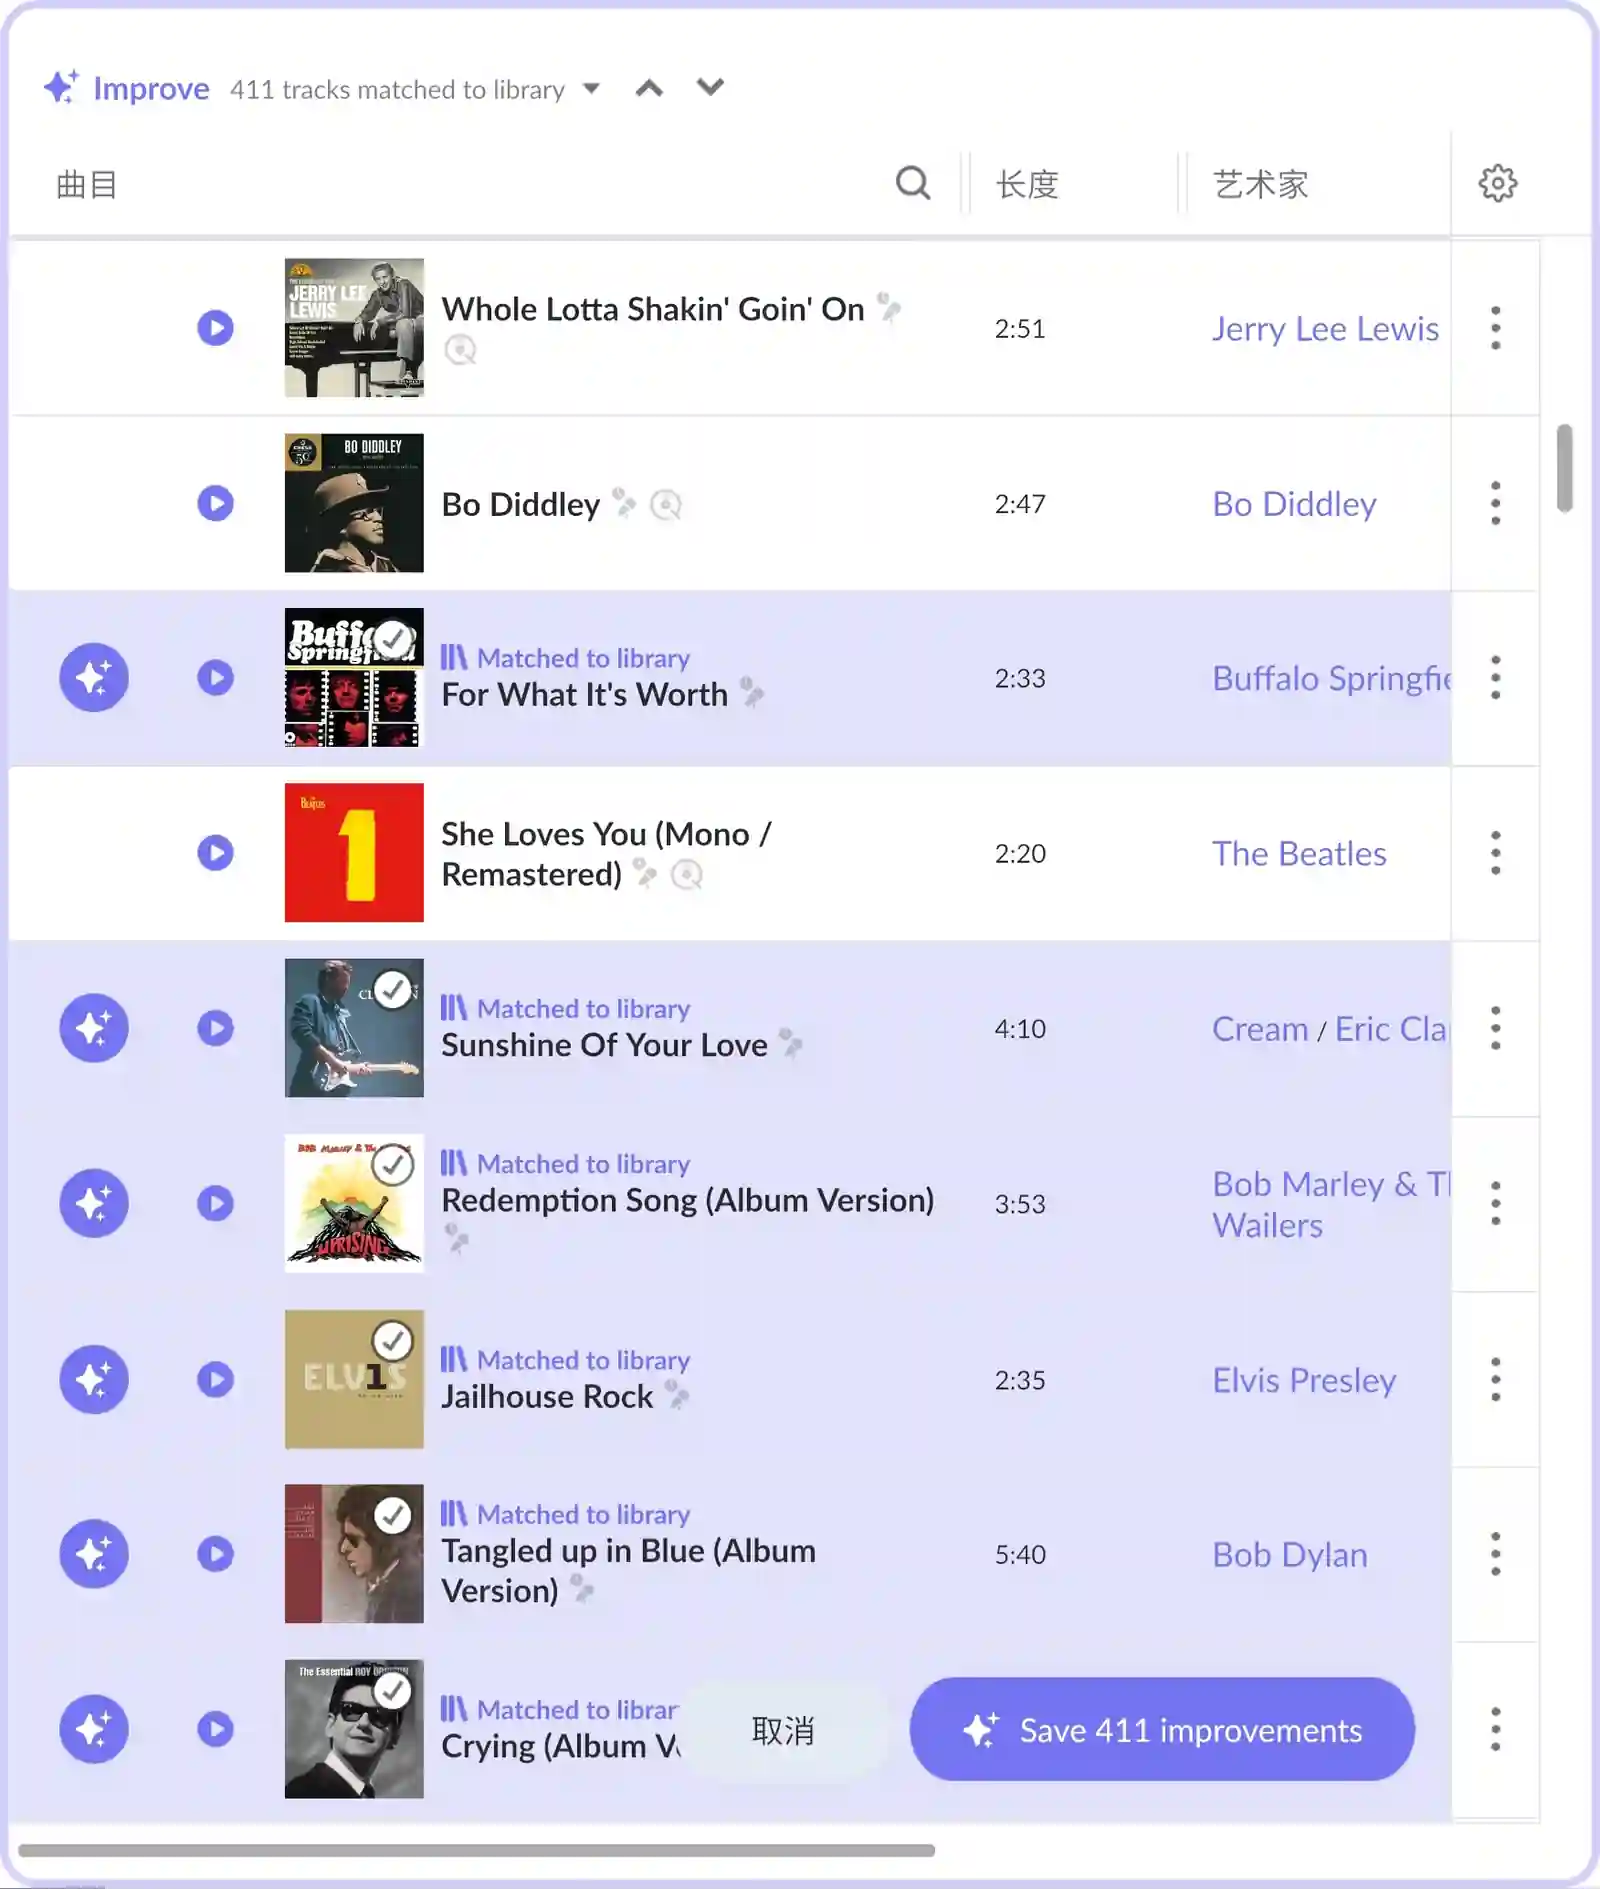 本地匹配
本地匹配
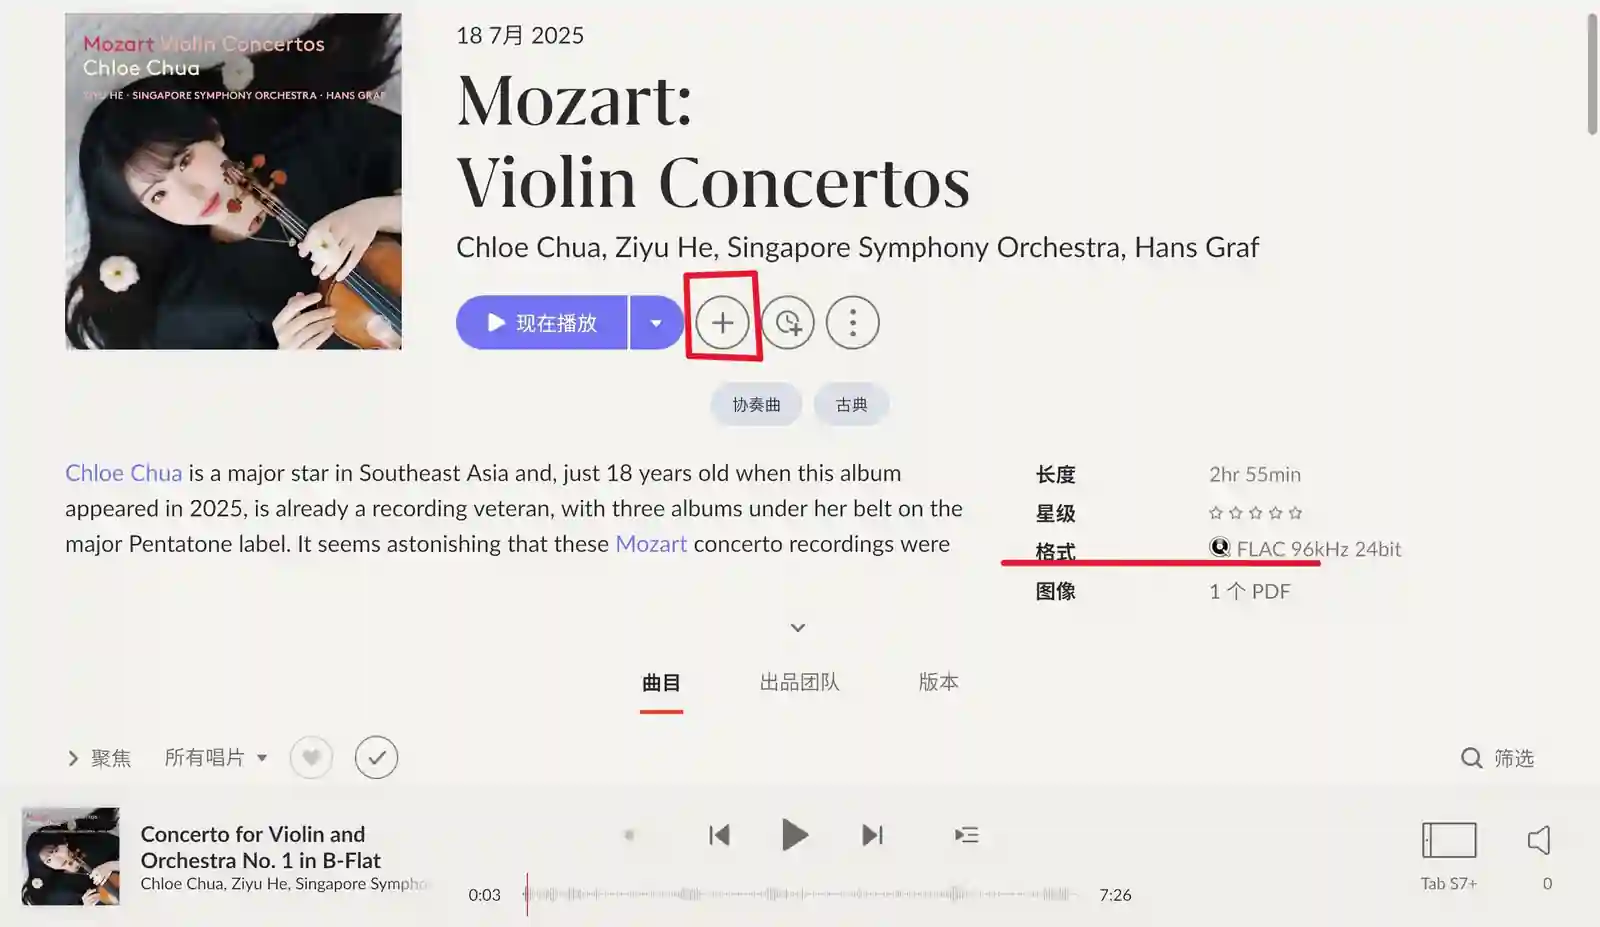 从Qobuz添加入Roon资料库
自动下载Qobuz专辑 #
跟随这一小结进行设置,就能完成在Roon客户端中将Qobuz专辑加入资料库,后台自动下载专辑至本地的自动化流程。
- 首先运行以下脚本,获取Qobuz的token:
python qobuz_auth.py # 在脚本中填入email和password
# qobuz_auth.py
import requests
import json
import base64

def get_qobuz_token(email, password):
    login_url = "https://www.qobuz.com/api.json/0.2/user/login"
    auth_str = base64.b64encode(b"user:password").decode('utf-8')
    headers = {
        "Authorization": f"Basic {auth_str}",
        "User-Agent": "Mozilla/5.0 (Windows NT 10.0; Win64; x64) AppleWebKit/537.36 (KHTML, like Gecko) Chrome/89.0.4389.90 Safari/537.36"
    }
    params = {
        "email": email,
        "password": password,
        "app_id": "950096963",
    }
    try:
        response = requests.get(login_url, headers=headers, params=params)
        response.raise_for_status()
        data = response.json()
        if data.get("user") and data.get("user_auth_token"):
            return str(data["user"]["id"]), data["user_auth_token"]
        else:
            print("登录失败:", data.get("message", "未知错误"))
            return None, None
    except requests.exceptions.RequestException as e:
        print(f"请求出错: {str(e)}")
        return None, None
    except json.JSONDecodeError:
        print("响应解析失败")
        return None, None

if __name__ == "__main__":
    email = ""  # 替换为你的Qobuz邮箱
    password = ""       # 替换为你的Qobuz密码
    app_id, auth_token = get_qobuz_token(email, password)
    if app_id and auth_token:
        print("获取成功:")
        print(f"app_id: {app_id}")
        print(f"auth_token: {auth_token}")
        with open("qobuz_token.json", "w") as f:
            json.dump({
                "app_id": app_id,
                "auth_token": auth_token,
                "email": email
            }, f, indent=2)
        print("凭据已保存到 qobuz_token.json")
    else:
        print("获取失败,请检查邮箱和密码")
- 安装
nathom/streamrip库,在配置文件中
~/.config/streamrip/config.toml填入刚刚获取的userid和token,同时完成以下列出的相关配置:
[qobuz]
# 1: 320kbps MP3, 2: 16/44.1, 3: 24/<=96, 4: 24/>=96
quality = 2
# This will download booklet pdfs that are included with some albums
download_booklets = true
use_auth_token = true
email_or_userid = ""
password_or_token = ""

[downloads]
# Folder where tracks are downloaded to
folder = "~/Music/Qobuz"
# Set to -1 for no limit
max_connections = 3
- 运行以下脚本,以获取Qobuz的红心专辑,并将专辑链接保存至
urls文件中,获取完连接后,脚本会清空Qobuz的红心:
python get_favorite_album.py
# get_favorite_album.py
import time
import requests
import ssl
from urllib3.util.ssl_ import create_urllib3_context
from requests.adapters import HTTPAdapter
import json

class QobuzAPI:
    API_URL = "https://www.qobuz.com/api.json/0.2"
    WEB_URL = "https://play.qobuz.com"

    def __init__(self, user_id, auth_token):
        self.user_id = user_id
        self.auth_token = auth_token
        self.session = self._create_secure_session()
        self.headers = {
                "X-App-Id": "950096963",
                "X-User-Auth-Token": self.auth_token,
                "User-Agent": "Mozilla/5.0"
            }

    def _create_secure_session(self):
        class TLSAdapter(HTTPAdapter):
            def init_poolmanager(self, *args, **kwargs):
                context = create_urllib3_context()
                try:
                    context.minimum_version = ssl.TLSVersion.TLSv1_2
                except AttributeError:
                    context.options |= ssl.OP_NO_SSLv3
                    context.options |= ssl.OP_NO_TLSv1
                    context.options |= ssl.OP_NO_TLSv1_1
                kwargs['ssl_context'] = context
                return super().init_poolmanager(*args, **kwargs)

        session = requests.Session()
        session.mount("https://", TLSAdapter())
        return session

    def get_favorites(self):
        try:
            response = self.session.get(
                f"{self.API_URL}/favorite/getUserFavorites",
                params={"user_id": self.user_id},
                headers=self.headers,
                timeout=10
            )
            return response.json()
        except Exception as e:
            print(f"Error: {str(e)}")
            raise

    def del_favorites(self, item_id):
        payload = {
            "user_id": self.user_id,
            "album_ids": str(item_id),
        }
        try:
            response = self.session.post(
                f"{self.API_URL}/favorite/delete",
                 params=payload,
                 headers=self.headers,
            )
            response.raise_for_status()
            result = response.json()
            return result.get("status")
        except requests.exceptions.RequestException as e:
            print(f"Failed: {str(e)}")
            return False

if __name__ == "__main__":
    with open("qobuz_token.json", "r", encoding="utf-8") as f:
        token_data = json.load(f)

    user_id = token_data.get("app_id")
    auth_token = token_data.get("auth_token")
    if not user_id or not auth_token:
        print("Missing user_id or auth_token in qobuz_token.json")
        exit(1)

    api = QobuzAPI(user_id=user_id,
                   auth_token=auth_token
                   )
    favorites = api.get_favorites()
    urls = []
    ids = []
    if "albums" in favorites and "items" in favorites["albums"]:
        for album in favorites["albums"]["items"]:
            if "url" in album:
                urls.append(album["url"])
            if "id" in album:
                ids.append(album["id"])

    if ids:
        with open("urls", "a", encoding="utf-8") as f:
            f.write("\n".join(urls) + "\n")
        with open("ids", "a", encoding="utf-8") as f:
            f.write("\n".join(ids) + "\n")
        print(f"new albums")
        for id in ids:
            api.del_favorites(id)
            time.sleep(1)
- 使用
streamrip下载专辑,可以反复运行几次,避免网络问题导致的失败:
rip file urls
- 我们可以定期执行步骤3、4,在n8n中流程可以为:
python get_favorite_album.py
# ⬇
# 判断输出是否为"new albums"
# ⬇
# 下载并归档urls
rip file urls && mv urls url_$(date +%s)
网易云曲目的自动入库 #
Roon本身没有集成网易云,网易云也没有提供官方的API,这就需要我们依赖第三方的API来接入网易云的曲目。我使用
mos9527/pyncm来和
pavoni/pyroon来自动管理网易云的每日推荐歌单和我在网易云自建的播放列表,最终实现的效果如下,我们可以不离开Roon也能收听来自网易云的歌曲,并同步喜好和推荐:
- 在Roon Remote中生成
每日推荐歌单,后台每日自动与网易云进行同步并下载资源(MP3 320K); - 若在Roon Remote中将歌曲加入列表
New Love for Netease,后台自动将列表内的歌曲添加至网易云的红心歌单; - 后台每日自动增量下载网易云歌单中的歌曲(FLAC,并嵌入lrc歌词),并生成m3u列表,在Roon Remote中显示。
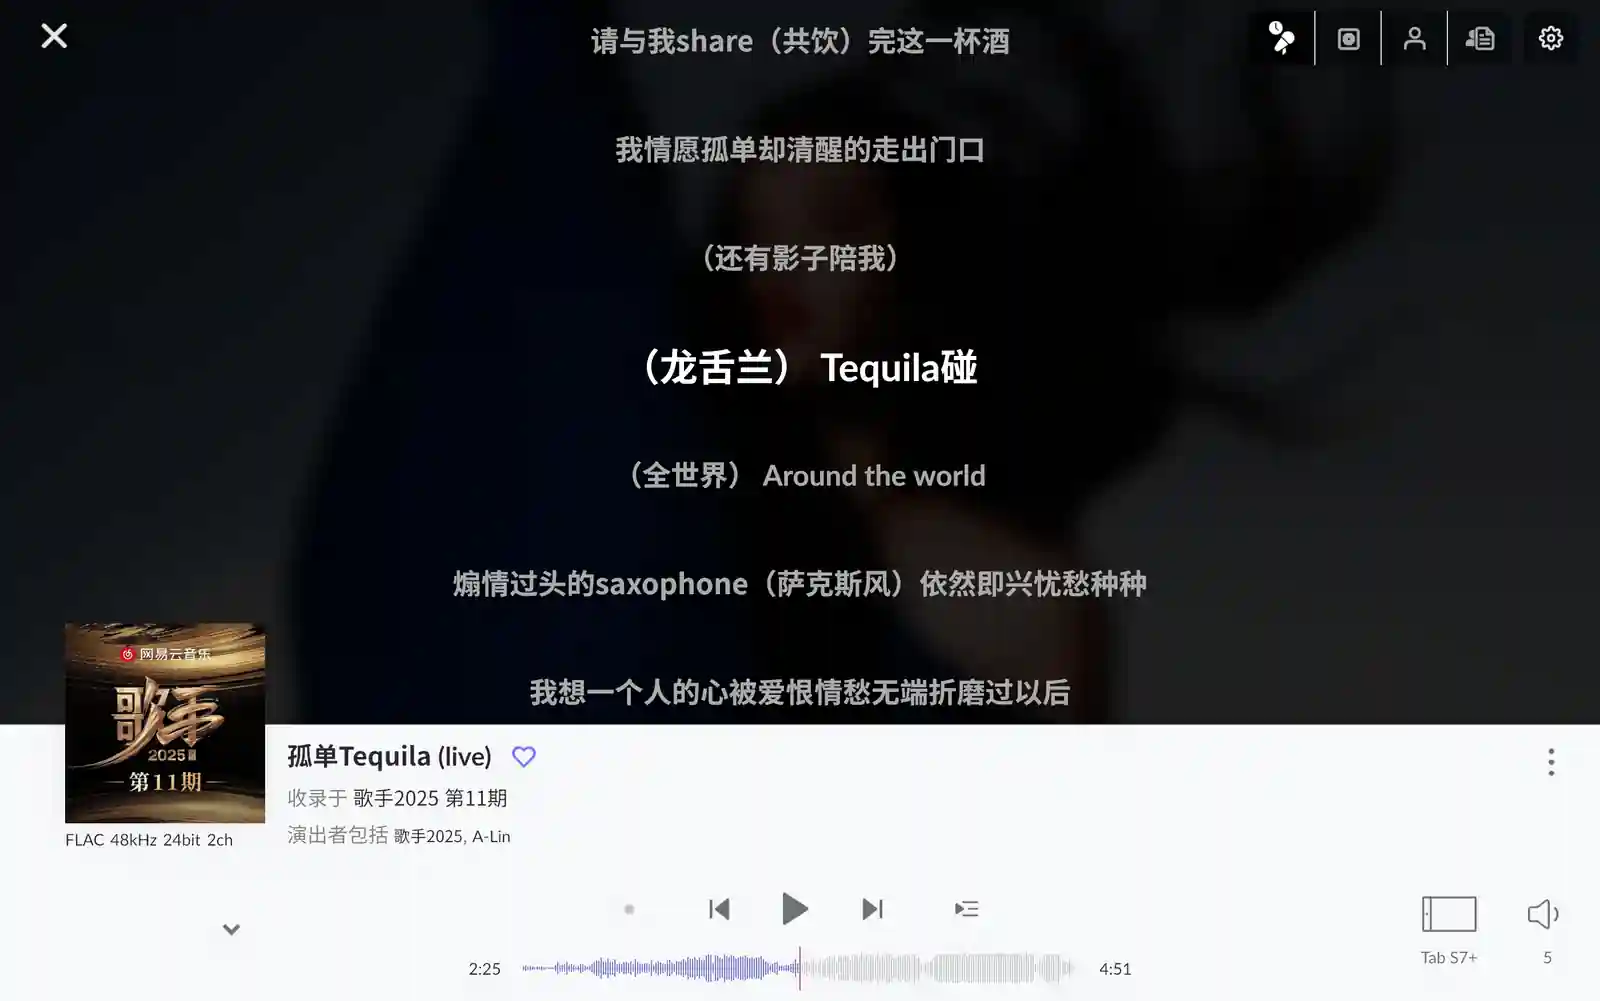 网易云音乐的自动入库
- 在开始前先给
pyncm加一个路由,获取每日推荐歌曲。然后根据pyncm仓库的文档,生成网易云的session.secret。
# /lib/python3.10/site-packages/pyncm/apis/playlist.py
@WeapiCryptoRequest
def GetDailylistInfo(offset=0, total=True, limit=1000):
    return "/weapi/v2/discovery/recommend/songs", {
    }
- 在Roon中注册一个插件,运行以下脚本,然后在Roon Remote的设置-扩展界面完成授权,最终文件夹下生成token和id文件:
python roon_discovery.py
# roon_discovery.py
import time
from roonapi import RoonApi, RoonDiscovery

appinfo = {
    "extension_id": "python_roon_test",
    "display_name": "Python library for Roon",
    "display_version": "1.0.0",
    "publisher": "me",
    "email": "[email protected]",
}

discover = RoonDiscovery(None)
servers = discover.all()

print("Shutdown discovery")
discover.stop()

print("Found the following servers")
print(servers)
apis = [RoonApi(appinfo, None, server[0], server[1], False) for server in servers]

auth_api = []
while len(auth_api) == 0:
    print("Waiting for authorisation")
    time.sleep(1)
    auth_api = [api for api in apis if api.token is not None]

api = auth_api[0]

print("Got authorisation")
print(api.host)
print(api.core_name)
print(api.core_id)

print("Shutdown apis")
for api in apis:
    api.stop()

# This is what we need to reconnect
core_id = api.core_id
token = api.token

with open("my_core_id_file", "w") as f:
    f.write(api.core_id)
with open("my_token_file", "w") as f:
    f.write(api.token)
-
在Roon Remote中新建一个播放列表,我命名为
New Love for Netease。 -
运行以下脚本,获取
New Love for Netease的item_key。(每次运行都将刷新item_key,运行一次即可)
python roon_read_list.py
# {'title': 'New Love for Netease', 'subtitle': '1 Track', 'image_key': None, 'item_key': '12:16', 'hint': 'list'}
# roon_read_list.py
from roonapi import RoonApi, RoonDiscovery

appinfo = {
    "extension_id": "python_roon_test",
    "display_name": "Python library for Roon",
    "display_version": "1.0.0",
    "publisher": "me",
    "email": "[email protected]",
}
try:
    core_id = open("my_core_id_file").read()
    token = open("my_token_file").read()
except OSError:
    print("Please authorise first using discovery.py")
    exit()
discover = RoonDiscovery(core_id)
server = discover.first()
discover.stop()
roonapi = RoonApi(appinfo, token, server[0], server[1], True)
opts = {
    "hierarchy": "playlists",
    "set_display_offset": 1,
    "pop_all": True,
}
roonapi.browse_browse(opts)
roon_browse_load = roonapi.browse_load(opts)
print(roon_browse_load)
- 将以下脚本的
"item_key": "12:16"换成自己的值,playlist.add_to_list(ready_ids, 123456789)中的数字换成自己的网易云红心歌单id。
# 打印每日推荐歌曲链接,检索数据库daily_songs.db,避免重复下载
python get_daily_playlist.py pull
# 将New Love for Netease歌单中的歌曲在网易云中标记红心
python get_daily_playlist.py push
# get_daily_playlist.py
from pyncm import apis,LoadSessionFromString,SetCurrentSession
import sqlite3
from roonapi import RoonApi, RoonDiscovery
import argparse

SESSION_PATH = ".secret"

class DailyPlaylist:
    def __init__(self, session, db):
        self.session = session
        self.db = db

        self.load_session()
        self.init_db()

    def load_session(self):
        with open(self.session, "r") as session_file:
            session_str = session_file.read()
        SetCurrentSession(LoadSessionFromString(session_str))

    def init_db(self):
        self.conn = sqlite3.connect(self.db)
        self.cursor = self.conn.cursor()
        self.cursor.execute('''
            CREATE TABLE IF NOT EXISTS daily_songs (
                id TEXT PRIMARY KEY,
                name TEXT,
                artist_id TEXT,
                artist TEXT,
                bookmark INTEGER DEFAULT 0,
                timestamp NUMBER DEFAULT (strftime('%s','now'))
            )
        ''')
        self.conn.commit()

    def fetch_daily_songs(self):
        daily_songs = apis.playlist.GetDailylistInfo()
        daily_songs_list = daily_songs["data"]["dailySongs"]
        return daily_songs_list

    def get_songs_not_in_db(self, songs):
        new_songs = []
        for song in songs:
            self.cursor.execute('SELECT 1 FROM daily_songs WHERE id = ?', (song["id"],))
            if not self.cursor.fetchone():
                new_songs.append(song)
        return new_songs

    def save_songs_to_db(self, songs):
        for song in songs:
            self.cursor.execute('''
                INSERT OR IGNORE INTO daily_songs (id, name, artist_id, artist)
                VALUES (?, ?, ?, ?)
            ''', (song["id"], song["name"], song["artists"][0]["id"], song["artists"][0]["name"]))
        self.conn.commit()

    def close_db(self):
        self.conn.close()

    def process(self):
        daily_songs = self.fetch_daily_songs()
        new_songs = self.get_songs_not_in_db(daily_songs)
        self.save_songs_to_db(new_songs)
        return new_songs

    def find_history(self, song_name):
        self.cursor.execute('SELECT id FROM daily_songs WHERE name = ? and bookmark = 0', (song_name,))
        result = self.cursor.fetchone()
        if result:
            self.cursor.execute('UPDATE daily_songs SET bookmark = 1 WHERE id = ?', (result[0],))
            self.conn.commit()
            return result[0]
        return None

    def add_to_list(self, song_ids, list_id):
        apis.playlist.SetManipulatePlaylistTracks(song_ids, playlistId=list_id, op="add")

class RoonSync:
    def __init__(self, core_id_file, token_file):
        self.core_id_file = core_id_file
        self.token_file = token_file
        self.roonapi = None
        self.connect()

    def connect(self):
        appinfo = {
            "extension_id": "python_roon_test",
            "display_name": "Python library for Roon",
            "display_version": "1.0.0",
            "publisher": "me",
            "email": "[email protected]",
        }

        try:
            core_id = open(self.core_id_file).read()
            token = open(self.token_file).read()
        except OSError:
            print("Please authorise first using discovery.py")
            exit()

        discover = RoonDiscovery(core_id)
        server = discover.first()
        discover.stop()

        self.roonapi = RoonApi(appinfo, token, server[0], server[1], True)

    def get_roon_items(self, option):
        self.roonapi.browse_browse(option)
        roon_browse_load = self.roonapi.browse_load(option)
        return roon_browse_load["items"]

if __name__ == '__main__':
    parser = argparse.ArgumentParser(description="Execute different modules")
    parser.add_argument("mode", choices=["pull", "push"], help="Select function to run")
    args = parser.parse_args()

    playlist = DailyPlaylist(SESSION_PATH, "daily_songs.db")

    if args.mode == "pull":
        new_songs = playlist.process()
        str_song_list = " ".join(
                f'"https://music.163.com/#/song?id={song["id"]}"'
                for song in new_songs
            )
        print(str_song_list)

    elif args.mode == "push":
        opts = {
            "hierarchy": "playlists",
            "item_key": "12:16",
        }
        roon_sync = RoonSync("my_core_id_file", "my_token_file")
        roon_browse_load = roon_sync.get_roon_items(opts)

        ready_ids = []
        for item in roon_browse_load:
            res = playlist.find_history(item["title"])
            if res:
                ready_ids.append(res)
        if ready_ids:
            playlist.add_to_list(ready_ids, 123456789)
            print(f"Added {len(ready_ids)} songs to the playlist.")
        else:
            print("No new songs to add.")

    playlist.close_db()
- 若在步骤4中使用
pull模式,将打印不重复的每日推荐歌曲,直接用pyncm的工具即可下载,{urls}为步骤4中打印的曲目链接:
pyncm --load .secret --output ~/Music/Single/daily --quality exhigh {urls}
- 用
pyncm的工具可下载指定歌单的歌曲,比如我的playlist设置为红心歌单的id:
pyncm --load .secret --output ~/Music/Single --quality lossless --no-overwrite "playlist=123456789"
- 我们只要定期在后台运行步骤4~6的代码即可,这里还有其它有用的脚本:
add_lyric.py,将下载的歌词嵌入到文件中,可在Roon Remote中直接显示;add_m3u.py,为每日推荐生成m3u文件;add_m3u_list.py,为指定歌单生成m3u文件;
# add_lyric.py
from mutagen.id3 import ID3, USLT
from mutagen.flac import FLAC
import os
folder_path = "~/Music/Single"
for file_name in os.listdir(folder_path):
    if file_name.endswith(".flac") or file_name.endswith(".mp3"):
        file_path = os.path.join(folder_path, file_name)
        base_name, extension = os.path.splitext(file_name)
        lrc_file_path = os.path.join(folder_path, base_name + ".lrc")
        if os.path.exists(lrc_file_path):
            with open(lrc_file_path, "r") as lrc_file:
                lyrics = lrc_file.read()
            if file_name.endswith(".flac"):
                flac_tags = FLAC(file_path)
                flac_tags["LYRICS"] = lyrics
                flac_tags.save()
                print("Added lyrics to:", file_name)
            elif file_name.endswith(".mp3"):
                audio = ID3(file_path)
                uslt_frame = USLT(encoding=3, lang='eng', desc='LYRICS', text=lyrics)
                audio.add(uslt_frame)
                audio.save()
# add_m3u.py
import os
folder_path = "~/Music/Single/daily"
m3u_file_path = "~/Music/Single/daily/每日推荐.m3u"
with open(m3u_file_path, "w") as m3u_file:
    m3u_file.write("#EXTM3U\n")
    for file_name in sorted(os.listdir(folder_path), key=lambda x: os.path.getmtime(os.path.join(folder_path, x)), reverse=True):
        file_path = os.path.join(folder_path, file_name)
        if file_name.endswith(".flac") or file_name.endswith(".mp3"):
            # 写入文件信息到M3U文件
            m3u_file.write(f"#EXTINF:-1,{file_name}\n")
            m3u_file.write(file_path + "\n")
# add_m3u_list.py
# encoding:utf-8
import os
from pyncm import apis, LoadSessionFromString, SetCurrentSession
from mutagen.id3 import ID3
from mutagen.flac import FLAC
LOVED_ID = "123456789"
SESSION_PATH = ".secret"

def get_filename_from_local_file(folder_path):
    id_dict = {}
    for file_name in os.listdir(folder_path):
        file_path = os.path.join(folder_path, file_name)
        if file_name.endswith(".mp3"):
            audio = ID3(file_path)
            if "NCM-ID" in audio:
                ncm_id = audio["NCM-ID"].text[0]
                id_dict[int(ncm_id)] = file_path
        elif file_name.endswith(".flac"):
            flac_tags = FLAC(file_path)
            if "NCM-ID" in flac_tags:
                ncm_id = flac_tags["NCM-ID"][0]
                id_dict[int(ncm_id)] = file_path
    return id_dict

def create_m3u_file_from_pyncm(list_info):
    id_dict = get_filename_from_local_file("~/Music/Single")
    m3u_str = "#EXTM3U\n"
    for song in list_info["playlist"]["tracks"]:
        if song["id"] in id_dict:
            file_name = os.path.basename(id_dict[song["id"]])
            m3u_str = m3u_str + f"#EXTINF:-1,{file_name}\n"
            m3u_str = m3u_str + id_dict[song["id"]] + "\n"
    m3u_name = "网易云-" + list_info["playlist"]["name"]
    with open("~/Music/Single/" + m3u_name + ".m3u", "w") as m3u_file:
        m3u_file.write(m3u_str)
    print(m3u_name + " updated")
if __name__ == '__main__':
    with open(SESSION_PATH, "r") as session_file:
                session_str = session_file.read()
    SetCurrentSession(LoadSessionFromString(session_str))
    # 创建m3u文件,填入你想要的歌单对应的id
    playlist_ids = {1234, 123456, 32453}
    for playlist_id in playlist_ids:
        playlist_json = apis.playlist.GetPlaylistInfo(playlist_id)
        create_m3u_file_from_pyncm(playlist_json)
Roon和Roon Arc的网络问题 #
有一段时间Roon的元数据更新和Roon Arc的访问在墙内均出现了问题。挂上代理后,元数据更新没问题了,但Arc的访问检测始终不稳定:
| 元数据 | Arc | |
|---|---|---|
| 直连 | 偶尔成功 | 偶尔成功 |
| 代理 | 稳定成功 | 稳定失败 |
Roon Arc的典型错误如下,可以猜测,Roon应该是用DDNS的机制让Arc对Roon Server进行访问,因此需要我们有公网IP,且在路由上做好相应的端口转发。
{
"ipv4_connectivity": {"status":"NetworkError","status_code":502,"error":"error: Error: connect ECONNREFUSED 91.nnn.ooo.ppp:55002, response code: undefined, body: undefined"},
"external_ip": {"actual_external_ip":"91.nnn.ooo.ppp","actual_external_ipv6":"null","router_external_ip":"null"},
"natpmp_autoconfig": {"status":"NotFound"},
"upnp_autoconfig": {"status":"NotFound"}
}
在Roon的目录中找到相关的endpoint:
cat /var/roon/RoonServer/Database/Registry/Core/dns_last_known_good_v1
{
    "bits.roonlabs.net": "35.231.208.158",
    "devicedb.roonlabs.net": "172.67.14.113",
    "geoip.roonlabs.net": "35.231.208.158",
    "roonmobile.roonlabs.net": "172.67.14.113",
    "discovery.roonlabs.net": "35.231.208.158",
    "push-manager.roonlabs.net": "35.231.208.158",
    "device-map.roonlabs.net": "35.231.208.158",
    "updates.roonlabs.com": "35.169.142.217",
    "events.roonlabs.net": "35.231.208.158",
    "accounts5.roonlabs.com": "34.148.110.116",
    "sooloos-profileimages.s3.amazonaws.com": "52.216.113.139",
    "auth.roonlabs.net": "35.231.208.158",
    "messaging.roonlabs.net": "35.231.208.158",
    "internetradio.roonlabs.net": "35.231.208.158",
    "metadataserver.roonlabs.net": "35.231.208.158",
    "download.roonlabs.net": "104.22.15.70",
    "www.qobuz.com": "104.244.45.246",
    "identifier.roonlabs.net": "35.231.208.158",
    "api.roonlabs.net": "104.20.47.62",
    "go.roonlabs.com": "35.231.208.158",
    "account.roon.app": "35.231.208.158",
    "streaming-qobuz-std.akamaized.net": "23.192.228.140"
}
Roon的日志在/var/roon/RoonS/Logs内,复制一份最新的日志来看看,
cp /var/roon/RoonServer/Logs/RoonServer_log.01.txt ./
里面有大量Roon的Debug日志,找到以下几条可能相关的,地址均为api.roonlabs.net:
Debug: [easyhttp] [21328] GET to https://api.roonlabs.net/porttest/1/myip returned after 433 ms, status code: 200, request body size: 0 B
Debug: [easyhttp] [21338] POST to https://api.roonlabs.net/porttest/1/port/check returned after 2087 ms, status code: 200, request body size: 742 B
Debug: [easyhttp] [21341] POST to https://api.roonlabs.net/roonmobile/1/cores/announce returned after 892 ms, status code: 200, request body size: 1 KB
用curl测试,/porttest/1/myip会直接返回我们的公网IP:
curl https://api.roonlabs.net/porttest/1/myip
通过抓包,获得/porttest/1/port/check的请求内容如下,{MY_IP}即为/porttest/1/myip返回的IP地址,55002是我们在Roon Remote中Arc设置的端口:
{
    "echo_uri":
"https://{MY_IP}:55002/mobile/1/api/portverify/XXXXXXXXXXXXXXXXXXX",
    "cert_hash": "XXXXXXXXXXXXXXXXXXX",
    "echo_headers": {
        "Authorization": "ROONv1 XXXXXXXXXXXXXXXXXXX",
        "Roon-Date": "XXXXXXXXXXXXXXXXXXX"
    }
}
通过抓包,获得/roonmobile/1/cores/announce的请求内容如下,显然localEndpoints和publicEndpoints分别是Roon Server的内网和公网IP地址;关闭路由的IPv6后,publicEndpoints只剩下"https://__ADDR__:55002/mobile/1/api",通过伪造/porttest/1/myip的响应发现此值不会变化,且将roonlabs.net挂上代理后,Arc无法访问到服务器,那么__ADDR__应该就是占位符了,由Roon云端解析,将/roonmobile/1/cores/announce请求源的IP地址做为Arc访问的目标。试图伪造/roonmobile/1/cores/announce请求,将自己的公网IP添加到publicEndpoints中,响应失败,Roon应该是在Authorization中加了签名,没找到Roon的密钥在哪,遂暂时作罢。
{
    "core": {
        "coreId": "XX",
        "machineId": "XX",
        "name": "XX",
        "platform": "XX",
        "osVersion": "XX",
        "machineVersion": "XX",
        "displayVersion": "XX",
        "product": "RoonServer",
        "deviceType": "RoonAppliance",
        "deviceClass": "Appliance",
        "isDev": false,
        "localEndpoints": [
            "https://192.168.1.2:55002/mobile/1/api",
            ...,
            ...,
            ...,
            ...
        ],
        "publicEndpoints": [
            "https://__ADDR__:55002/mobile/1/api",
            "https://{IPV6_ADDRESS}:55002/mobile/1/api"
        ],
        "credentials": {},
        "clientData": {
            "accessStatus": "Ready",
            "accountStatus": "LoggedIn",
            "machineStatus": "Licensed",
            "loadStatus": "Ready",
            "updateStatus": "UpToDate",
            "currentSyncApiVersion": 8,
            "minSyncApiVersion": 4
        }
    }
}
网络配置建议 #
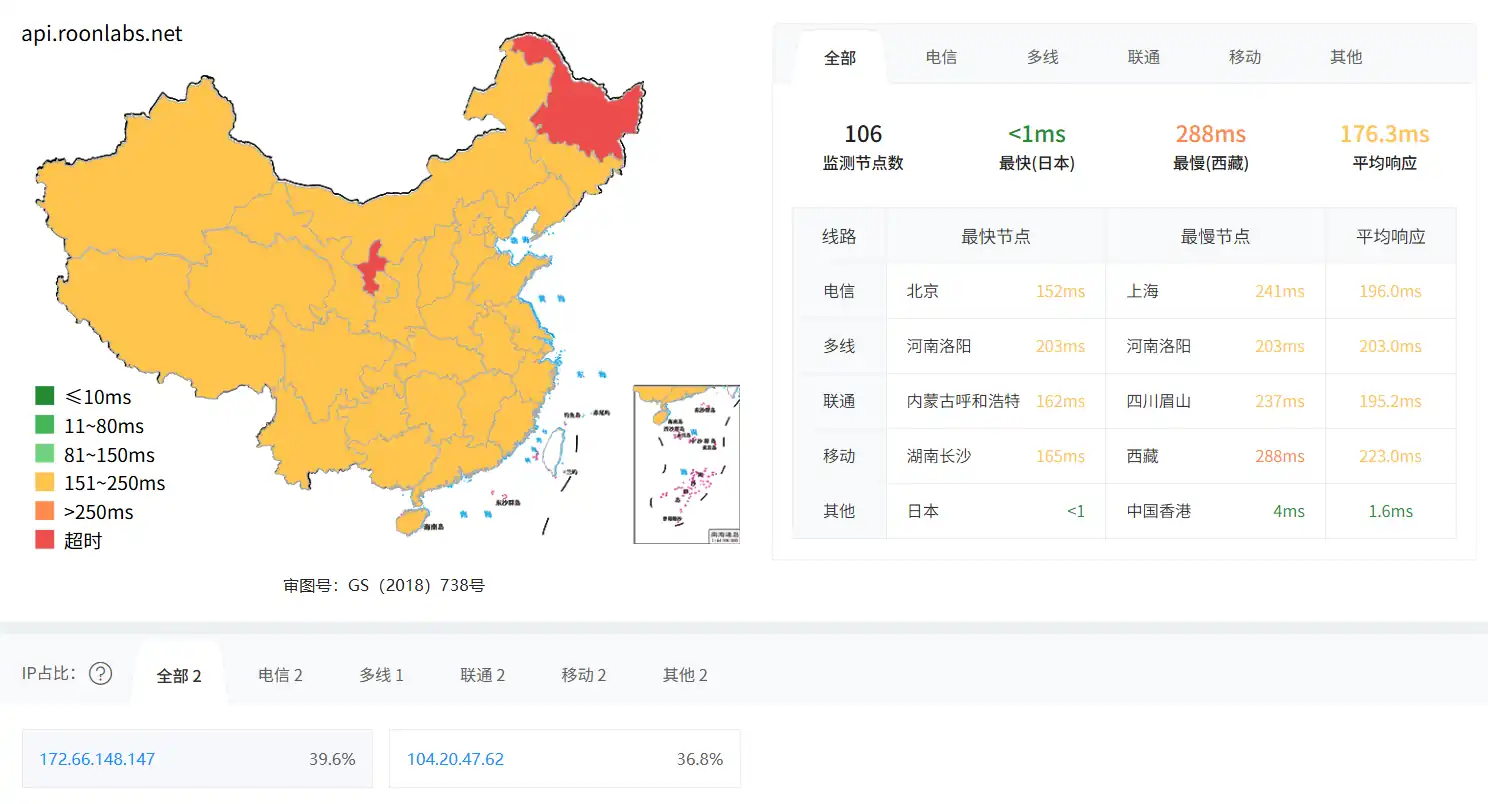
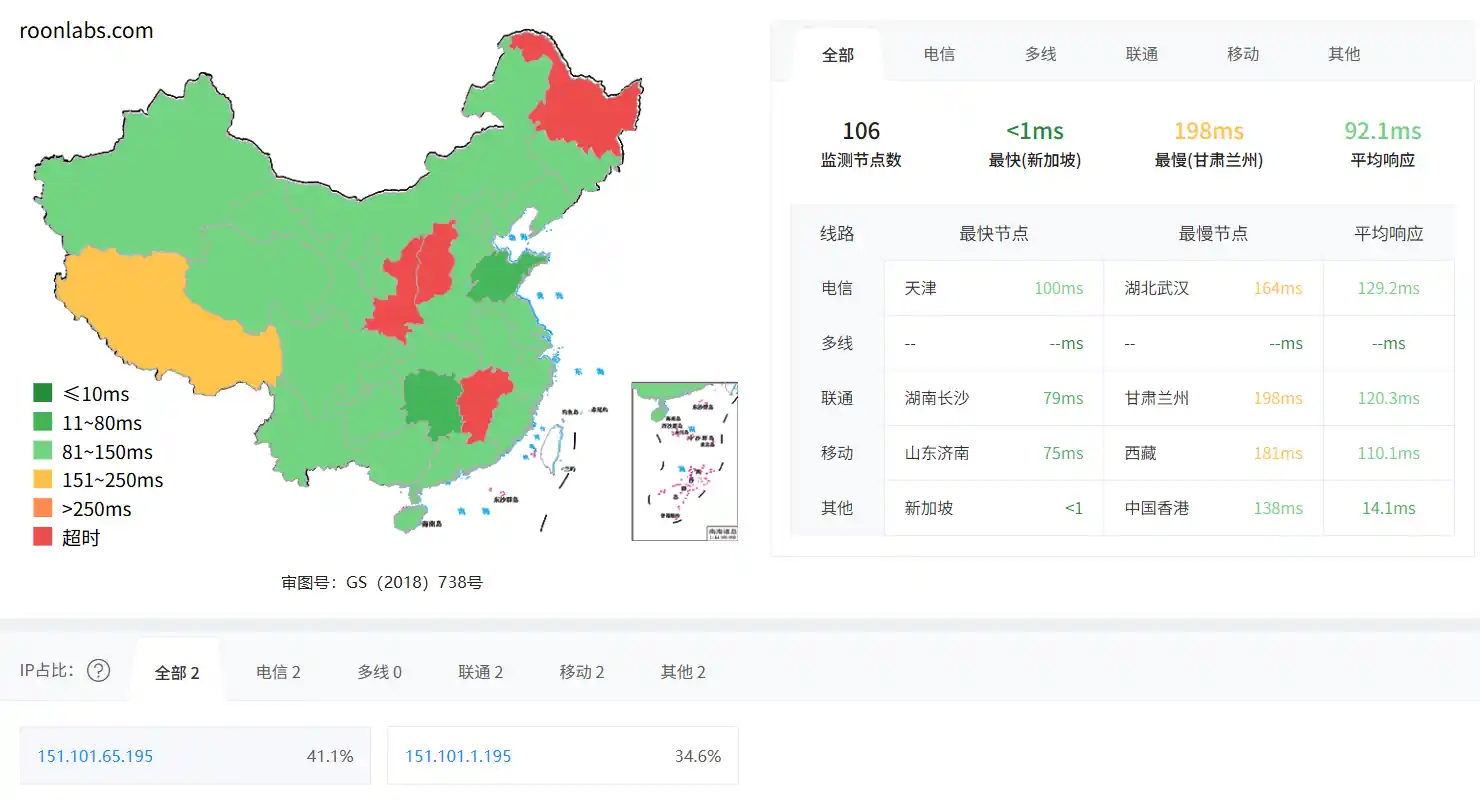
最近,国内大部分地区对roonlabs.net和roonlabs.com访问限制似乎又解除了(见下图),因此,当前的最佳实践就是采用直连,可以兼顾Roon元数据和Arc的访问:
# clash规则
- DOMAIN-SUFFIX,roonlabs.net,DIRECT
- DOMAIN-SUFFIX,roonlabs.com,DIRECT
若GFW对roonlabs.net和roonlabs.com访问限制,可以挂代理解决Roon元数据获取问题,对于Arc的使用,则可用官方建议的Tailscale1或Wireguard解决(本质都是组网)。
# clash规则
- DOMAIN-SUFFIX,roonlabs.net,PROXY
- DOMAIN-SUFFIX,roonlabs.com,PROXY
若不是通过路由设置代理,则需要修改Roon Server的启动项,手动添加代理服务器/etc/systemd/system/roonserver.service:
Environment="http_proxy=http://127.0.0.1:7890"
Environment="https_proxy=http://127.0.0.1:7890"
若想同时实现对元数据挂代理并在公网直接使用Arc,则需要解决/roonmobile/1/cores/announce中上报的公网地址,可以尝试这两种方法:
- 开启IPv6并在主机做相应的端口设置;
- 伪造请求,将自己的公网地址加进去;(需重新生成签名)
对于Qobuz的串流,目前仍然可以直接访问,若要更稳定地串流,也可以对Qobuz的服务地址进行代理:
# clash规则
- DOMAIN-SUFFIX,qobuz.com,PROXY
- DOMAIN,streaming-qobuz-std.akamaized.net,PROXY